 |
|
|
|
||||||
|
SkyPoint Communications is a full service Internet Service Provider.
Setting Up the Dial-up Networking Software
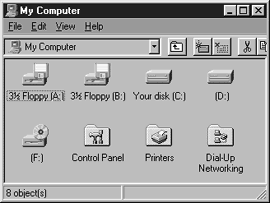
1. Check if the Dial-up Networking software is installed. Double-click on the "My Computer" icon. You should see an icon labeled "Dial-up Networking" in the "My Computer" window.

If you can NOT find "Dial-up Networking", you will need to install it. You will need to:
- a. Locate your Windows 95 CD-ROM installation disk or floppies. Put it in the CD-ROM drive (or your floppy drive) and wait for it to show up on your desktop.
- b. Select "Add/Remove Programs". Double-click on the "My Computer" icon. In the "My Computer" window, double-click on the "Control Panel" icon. Double-click on the "Add/Remove P rograms" icon.
- c. Select the "Windows Setup" tab. At the top of the window, you will see buttons that look like file folder tabs. Click on the "Windows Setup" tab.
- d. Select "Communications". Click on the check box to the left of the "Communications" option in the window, so that it shows a checkmark. Make sure that this is the ONLY box that shows a checkmark - if any other box es are marked, click them so that the checkmark disappears. Double-click on the "Communications" option in the window. A "Communications" window will appear.
- e. Select "Dial-up Networking". Click on the check box next to the "Dial-up Networking" option so that a checkmark appears in it.
- f. Select "OK". Click the "OK" button.
- g. Select "OK". Click the "OK" button at the bottom of the window. The computer will now install the software.
- h. Reboot your computer. A window will appear asking whether it is OK for the computer to restart. Click "Yes."
- i. Check that the software is installed correctly. Click on the "My Computer" icon. You should now see an icon labeled "Dial-up Networking."
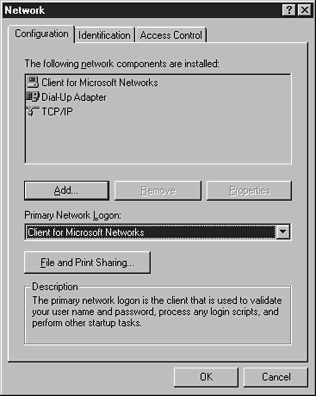
2.Check if the TCP/IP Protocol is installed. Double-click on the "Control Panel" icon. In the "Control Panel" window, double-click on the "Network" icon. A Network "Configuration" window will app ear.

A list of items will appear in a pane under the label "The following network components are installed:."
- a. Remove "Client for Netware Networks". NOTE: this step is to be done ONLY if your computer is NOT running on a Novell (Netware) network. Look for an entry labeled "Client for Netware Networks." If it is there, click on "Client for Netware Networks" then click on the "Remove" button.
- b. Remove "NetBEUI". Look for an entry labeled "NetBEUI." If it is there, click on "NetBEUI" then click on the "Remove" button.
- c. Remove "IPX/SPX". NOTE: this step is to be done ONLY if your computer is NOT running on a Novell (Netware) network. Look for an entry labeled "IPX/SPX." If it is there, click on "IPX/SPX" then click on the "Remove" button.
- d. Locate "TCP/IP". Look for an entry labeled "TCP/IP." If it is NOT there, you will need to install it. To install it:
- I. Select "Add". Click on the "Add" button. Another window with a list of options will appear.
- II. Open the protocol options window. Double-click on the "Protocol" option. Another window will appear with protocol options.
- III. Select "Microsoft". Click on the "Microsoft" option on the left side of the window to highlight it. A list of options will appear at the right side of the window.
- IV. Select "TCP/IP". Click on the "TCP/IP" option at the right side of the window.
- V. Exit the add option. Click on the "OK" button.
- e.Locate "Client for Microsoft Networks". Look for an entry labeled "Client for Microsoft Networks." If it is NOT there, you will need to install it. To install it:
- I. Select "Add". Click on the "Add" button. Another window with a list of options will appear.
- II. Open the protocol options window. Double-click on the "Client" option. Another window will appear with client options.
- III. Select "Microsoft". Click on the "Microsoft" option on the left side of the window to highlight it. A list of options will appear at the right side of the window.
- IV. Select "Client for Microsoft Networks". Click on the "Client for Microsoft Networks" option at the right side of the window.
- V. Exit the add option. Click on the "OK" button.
- f. For users who have installed software in steps d or e ONLY.
- I.Exit the software. Click on the "OK" button. You may need to do this several times to exit the software.
- II.Allow the computer to reboot. Your computer may ask you if you want to restart it now. Click on the "Yes" button.
- III.Re-enter the Network software. Double-click on the "Control Panel" icon. In the "Control Panel" window, Double-click on the "Network" icon. The Network "Configuration" window will appe ar.
- g. Select the Primary Network Logon. In the "Primary Network Logon" pull-down menu, select "Client for Microsoft Networks."
- h. Exit the software. Click the "OK" button at the bottom of the window.
3. Install your modem. If you are using a new modem and have NOT installed it already, you will need to install it now.
- a. Select "Add New Hardware". In the Control Panel window, Double-click on the "Add New Hardware" icon.
- b. Follow the instructions shown by Windows 95. You will be given a short, simple series of instructions by Windows 95. Windows 95 will do most of the work of configuring your modem with its "sniff and sense" software.
4. Create a Dial-up connection icon for SkyPoint.
- a. Open the Dial-up Networking software. Double-Click on the "Dial-up Networking" icon in the "My Computer" window.

- b. Select "Make New Connection". Double-click on the "Make New Connection" icon.
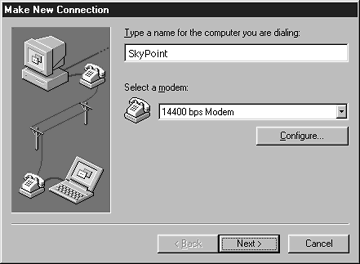
- c. Name the new connection. In the box labeled "Type a name for the computer you are dialing," type SkyPoint.
- d. Continue to the next window. Click on the "Next>" button at the bottom of the window.
- e. Enter SkyPoint's telephone number. In the "Telephone number" box, type SkyPoint's telephone number. Do NOT enter the area code in the "Area code" box unless the call is a long-distance call for you.
- In the Minneapolis/St. Paul Area: Telephone: 612-473-5646 56K: 612-252-9020
- In the Duluth/Superior Area: Telephone: 218-720-5800 56K: 218-723-8777
- f. Continue to the next window. Click on the "Next>" button at the bottom of the window.
- g. Exit the window. Click on the "Finished" button at the bottom of the window. You should now see a new Dial-up icon labeled "SkyPoint."
5. Configure your new SkyPoint Dial-up icon. Click on the SkyPoint icon that you just created to highlight it. Click on the file menu button at the top of the "Dial-up Networking" window and select the "Properties" op tion. A new window will appear.
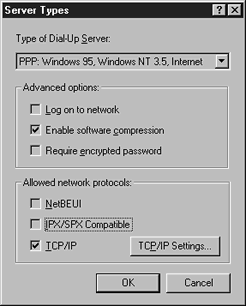
- a. Select "Server types". Click on the "Server Types" button. A window will appear.

- b. Select server type. Near the top of the window you will see a "Type of Dial-Up Server" pull-down menu. Select the "PPP: Windows 95, Windows NT 3.5, Internet" option.
- c. Select "TCP/IP". In a section of the window labeled "Allowed network protocols," Click on the check box to the left of "TCP/IP." A checkmark mark should appear in the box.
- d. Select "TCP/IP Settings". Click on the "TCP/IP Settings" button. Another window will appear.
- e.Select "Server assigned IP address". If the circle to the left of the "Server assigned IP address" label does NOT have a dark center, Click on it.
- f. Enter the Primary DNS server address. In the "Primary DNS" server box, type 199.86.32.2. In the "Secondary DNS" server box, type 199.86.32.4.
- g. Select "Use IP header compression". If the circle to the left of the "Use IP header compression" label does NOT have a dark center, Click on it.
- h. Select "Use default gateway on remote network". If the circle to the left of the "Use default gateway on remote network" label does NOT have a dark center, Click on it.
- i. Exit the "Properties" window. Click the "OK" button. You will see this button appear twice more. Each time, Click it. You will eventually be back in the "Dial-up Networking" window.
6.Dial in. Double-click on the SkyPoint icon. A "Connect To" window will appear.
- a. Enter your User name. In the "User name" box, type in the Username you were given by SkyPoint.
- b. Enter your Password. In the "Password" box, type in the Password you were given by SkyPoint.
- c. Save your Password. NOTE: this step is OPTIONAL. If you are concerned about the security of your account, do NOT save your password. You will have to manually re-enter it every time you log on. To save your password, click on the "Save password" check box.
- d. IF YOU HAVE CALL WAITING, select "Dial Properties". Click on the "Dial Properties" button. A new window will appear.
- I. Turn on the call waiting disabling option. If your call waiting is not disabled while you are connected to the Internet, the line "Clicks" announcing incoming calls will break your connection. Click the check box to the le ft of the "This location has call waiting. To disable it, dial" label. A checkmark mark should appear in the box.
- II. Set the call waiting disabling option. To the right of the label is a pull-down menu. Click on it and select the correct string to disable call waiting on your phone line:
- For Touchtone Phones: *70
- For Rotary Phones: 1170
This string will only disable call waiting for a single phone call, and call waiting will automatically turn back on as soon as you hang up.
- e. Connect to SkyPoint. Click the "Connect" button.
Help | About Us | Services | Members | Contact Us